The Canvas Toolbar sits above the main Canvas view and provides shortcuts to many features and functions of the Canvas interface. Each set of items is grouped together based on their functionality. This article goes into depth on each of these groups and items.
¶ Groups Overview
The Canvas Toolbar is organized into the following groups:
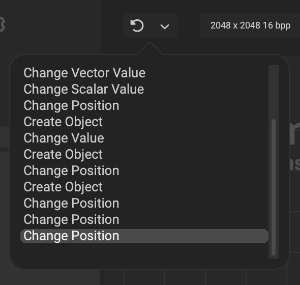
- Undo History: Displays a popup of the session's undo history allowing the user to jump back to a previous point.
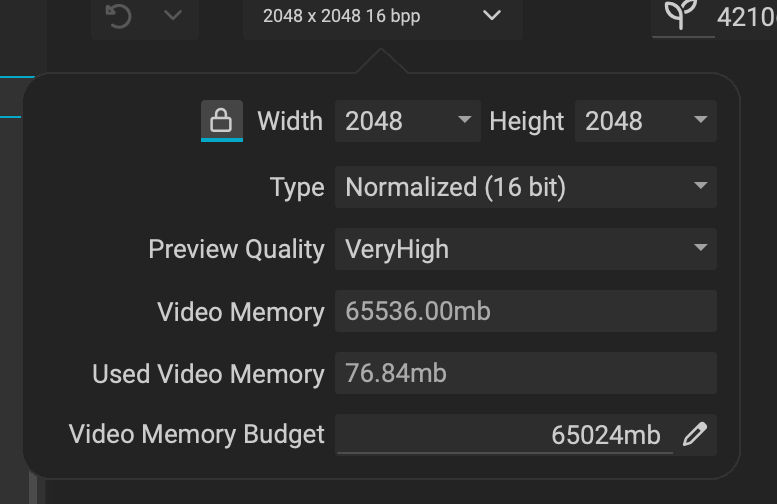
- Global Execution Settings: Controls the execution resolution, format, and video memory settings for the active graph.
- Global Seed: Controls the global seed of the active graph.
- Center View Selection: Determines which view takes up the center area (
Canvas,Viewport, orImage Viewer) - Project Management: Creates a new project, saves the current project, or opens the Image and Data Output Export dialog.
- Baking and Raytracing: Opens Mesh Baking and
Polyversepanels. - Output Log and Dope Sheet: Opens the
Output Logand Dope Sheet panels. - Canvas Tools and Display Functions: Provides control over various
Canvasfunctionality and display options. - Graph Performance Tools: Gives access to various graph performance and execution tools.
¶ Undo History
 The Undo History button is divided into two sections:
 Undo Button, and Undo History Popup. Clicking the left portion with the icon will perform an undo operation.
Additonally the keyboard shortcut Cmd/Ctrl + Z can be used to undo, and Shift + Cmd/Ctrl + Z will redo.
 Clicking the downward arrow will open up the
 Undo History Popup.
This popup displays the undo history for the active session. The order of the items are listed where the most recent action is at the bottom. Clicking on one of the items will undo back to the historical state where that operation took place. As long as no additional changes are made, clicking on future items at the bottom will restore and "redo" the subsequent actions until reaching the latest step.
¶ Global Execution Settings
 This dropdown determines the global resolution, format, and video memory settings for the active graph.
The Global Execution Settings dropdown controls the size and format of the active graph. Clicking the icon will maintain the same Width and Height values so that they are always equal.
The video memory information displays the total amount of video memory available to InstaMAT as well as how much of it InstaMAT is currently using. Use the Video Memory Budget parameter to specify the video memory budget for InstaMAT.
Note: This is not a hard limit as certain graph executions cannot be constrainted. If a render operation would exceed the memory budget, InstaMAT Will free GPU resources of the current graph. This may resultin slower rendering performance when performing changes, as freed resources are required to be recomputed
¶ Global Seed
 The
The Global Seed value sets the seed for all randomized parameters and attributes in the active graph. This is useful to quickly preview variations of the same material in an Element Graph. This seed value is also used when exporting graph outputs to disk.
Right Clicking the seed provides a contextual menu allowing to reset the number to InstaMAT's default seed value.
¶ Center View Selection
These items determine which view takes up the center area of the Canvas interface. By clicking on the icon matching with the corresponding view, the interface will shift and reorganize accordingly. The icons correspond as follows:
-
Canvas -
Viewport -
Image Viewer
Additionally, the keyboard shortcut Option/Alt + C cycles through each option.
Switching the Viewport to the center view is a great way to quickly perform design reviews of your 3D assets and materials. To learn more, read our dedicated article on cycling the center view here.
¶ Project Management
These items provide shortcuts to common project management actions.
- New Project: Opens the
New Projectscreen. - Save Project: Saves the active project.
- Export Image and Data Outputs: Opens the Image and Data Output Export dialog. Use this dialog to export the graph's outputs to disk.
¶ Baking and Polyverse
These items provide access to the Mesh Baking and Raytracing panels.
- Mesh Baking: Opens the Mesh Baking panel. Baked mesh maps will be added to the active package and found in the Package Management panel.
- Polyverse: Opens the
Polyversepanel.
¶ Output Log and Dope Sheet
These items provide access to the Output Log and Dope Sheet panels.
- Output Log: Opens the
Output Logpanel. - Dope Sheet: Opens the Dope Sheet panel. Use this panel to animate input parameters of the current project using keyframe interpolation.
¶ Canvas Tools and Display Functions
These items provide quick access to additional Canvas tools and functions.
- Automatically Render Graph: When enabled, the graph will automatically render when a change is made. Useful to turn off if there are a few changes to be made and the graph requires intensive processing.
- Flash Rendered Nodes: When enabled, nodes that are executed will flash with a yellow outline. This helps to visually determine which section of the graph is being utilized when changes are being made.
- Connection Rendering Mode: Determines the style in which connections are drawn in the
Canvas. Cycle between smooth, angular, and straight lines. - Link Category Mode: Combines related input and output pins that share the same category. Useful when blending multiple materials together or working with mesh bake data. Connections turn blue, and nodes in the
Canvasfeature a blue line on the bottom to signify that Link Category Mode is active. - Canvas Previews: Toggles the preview thumbnails for nodes in the graph. Disabling can reduce a graph's memory footprint.
- Minimap: Displays the Minimap.
- Lock Comments: When enabled, comments are locked and cannot be accidentally selected or moved.
¶ Graph Performance Tools
These items assist in diagnosing the performance and execution of the active graph.
- Render Unconnected Nodes: When disabled, nodes that are disconnected from a graph output are not rendered. Useful when optimizing a graph to only execute nodes that are actively used.
- Show Timings: Toggles the execution timings which are visible on both the
Canvasbackground and on individual nodes.
To view timing information about a particular set of nodes, use Shift + Left Click to drag a selection over multiple. A table will appear in the Graph Object Editor displaying the name, format, size, and execution time of each node. Each column of the table is sortable making it easy to understand which portions of the graph take the most amount of compilation time. Additionally using the shortcut Cmd/Ctrl + A can be used to select all nodes in the active graph.
- Canvas Update Time Mode: Determines the rendering priority of the Image Viewer versus the
Canvasnode preview thumbnails. Toggling the speedometer to the right will prioritize rendering the node thumbnails. Toggling to the left prioritizes theImage Viewer.