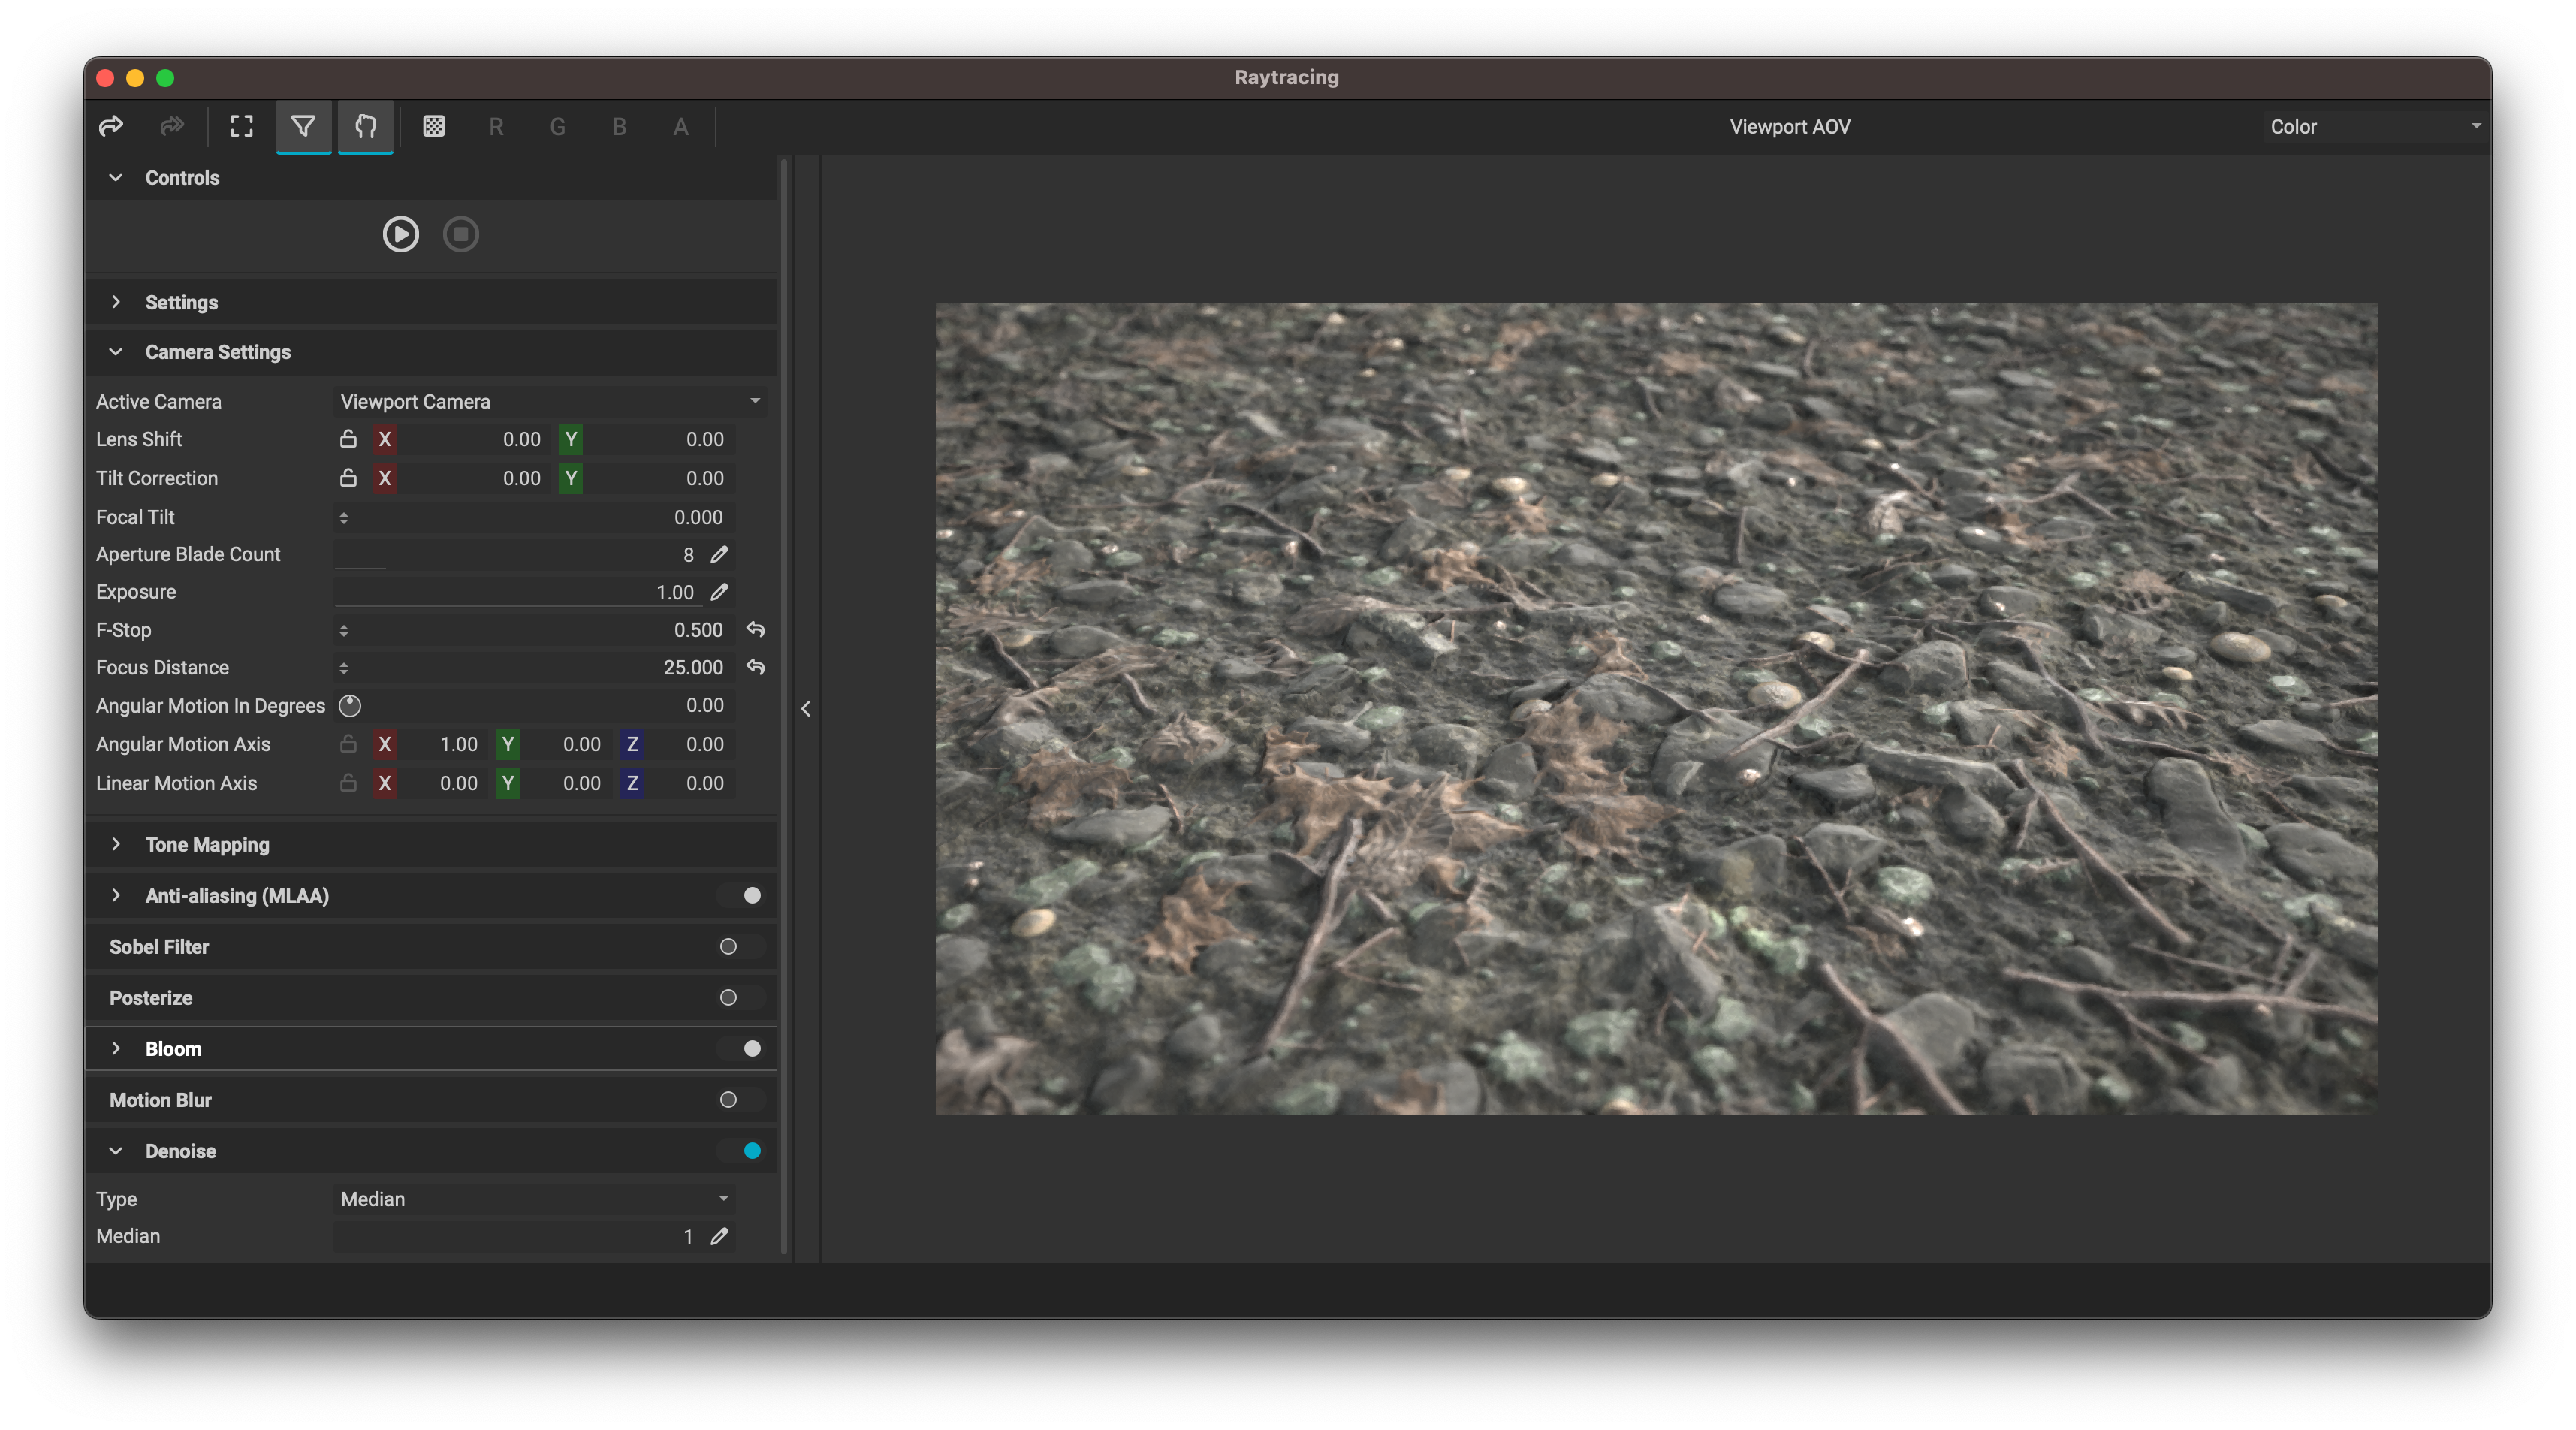
The Raytracing panel contains the AMD Radeon™ ProRender raytracing engine. This allows users to quickly generate photo-real images with just a few clicks using both CPUs and GPUs. The automatic PBR material conversion allows for seamless usability between the real-time Viewport and the AMD Radeon™ ProRender scene. The powerful post-processing stack enables final-shot compositing and product shots to be generated directly inside InstaMAT Studio.
¶ Interface Overview
The user interface for the Raytracing panel is divided into three parts. The settings on the left, the toolbar at the top, and the raytracing viewport on the right.
¶ Settings
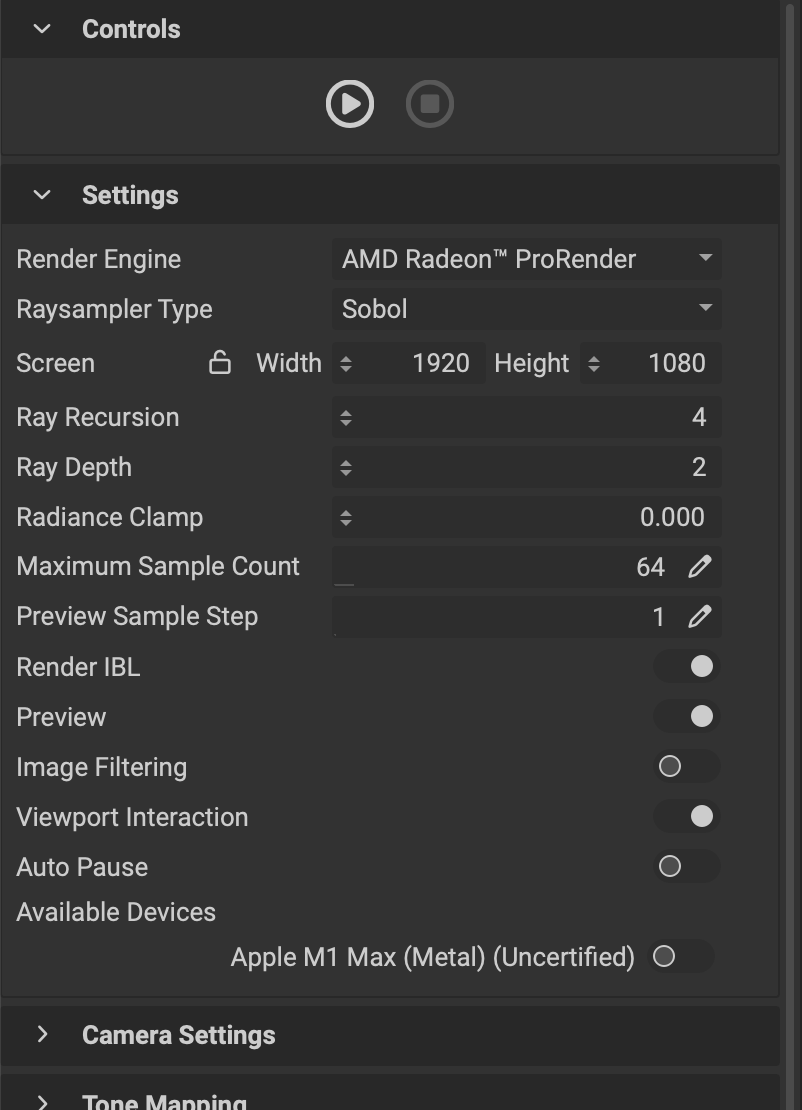
 The left panel contains all of the render settings for the AMD Radeon™ ProRender engine.
The
Settingspanel can be hidden by clicking the arrow between theSettingspanel and the raytracing viewport.
¶ Controls
 These buttons control the state of the raytracing engine.
- Play/Pause: Starts or pauses the render
- Stop: Stops the render
The rendered image size and current sample iteration are displayed along the bottom in the
Raytracingpanel's status bar.
¶ Settings
These are the main settings for the Raytracing panel.
- Render Engine: Sets the active raytracing render engine.
- Raysampler Type: Determines the ray sampling type.
- Sobol: casts rays in a uniform fashion.
- Adaptive: prioritizes ray casting in noisy areas.
- Random: cast samples randomly.
- Screen: Sets the
WidthandHeightof the rendered image. - Ray Recursion: Sets the maximum recursion depth for rays.
- Ray Depth: Sets the maximum depth for refraction, glossy, etc.
- Radiance Clamp: Sets the radiance clamp to avoid fire flies.
- Maximum Sample Count: Sets the maximum amount of samples for the rendered image. Rendering stops if the amount of samples have been generated.
- Preview Sample Step: Displays a render preview every "x" number of samples. When set to
Offby sliding to or entering '0', only the final image is displayed in the Raytracing Viewport. - Render IBL: Renders the (Image Based Lighting) background image.
- Preview: Renders the image at half resolution for the first 10 samples.
- Image Filtering: Applies filtering when scaling the image to fit the raytracing viewport.
To scale the rendered image to fit the raytracing viewport, click the
(Scale Image) button in the
Raytracingpanel's toolbar.
- Viewport Interaction: Allows interacting with the scene through the raytracing viewport. The same navigation hotkeys can be used from InstaMAT Studio's real-time Viewport.
- Auto Pause: Pauses rendering after one second of user input inactivity.
- Available Devices: Lists the compatible devices available for use. Click the switch next to the device to use it for raytracing.
¶ Camera Settings
These settings adjust the raytracing camera.
- Active Camera: Selects the active camera used for raytracing.
- Lens Shift: Shifts the camera for fine adjustments.
- Tilt Correction: Tilts the camera for fine adjustments.
- Focal Tilt: Sets the focal tilt of the camera.
- Aperture Blade Count: Sets the blade count for the camera's aperture. This changes bokeh shapes and affects the camera blur.
- Exposure: Sets the exposure of the camera.
- F-Stop: Sets the camera's F-Stop. Decrease to provide a more shallow depth of field.
- Focus Distance: Sets the distance of the camera's focus point. Objects at this distance will be in focus.
- Angular Motion In Degrees: Applies motion blur with the set angle in degrees.
- Angular Motion Axis: Sets the axis for the angular motion blur.
- Linear Motion Axis: Sets the Linear Motion Axis using an XYZ vector.
¶ Tone Mapping
These settings apply to the photographic tone mapping filter that emulates the work of a camera.
- Type: Sets the tone mapping type. Various tone mapping types allow for different image grading results. Depending on the type, different settings are enabled for finer control over image values and exposure.
- Auto-linear: Photographic tone mapper that uses default camera characteristic values and the average luminance of a picture.
- Reinhard: Performs Reinhard02 tone mapping.
- Photometric: Photographic tone mapper that creates a photorealistic color grade.
- Gamma: Provides a gamma correction value.
- Exposure: Sets the film exposure time.
- Sensitivity: Sets the Luminance of the scene (in candela per m^2).
- F-Stop: Sets the aperture f-number.
- Vignette: Provides a camera vignette around the rendered image.
- Saturation: Sets the saturation used for sensitivity computation.
- Lighten: Brightens up highlights. Higher settings bring highlights closer to white.
- Darken: Darkens shadowed areas. Higher settings bring shadowed areas closer to black.
- Focal Length: Sets the camera focal length.
- ISO: Sets the film ISO value.
- Use ISO: If enabled, uses the provided ISO value. Otherwise, uses the
Saturationto compute sensitivity.
¶ Post Processing Stack
The post-processing stack includes various filters and effects to complete entire product shots without needing to export the render into an image editing program. To enable a feature, click the toggle to the right.
- Anti-aliasing (MLAA): Adds anti-aliasing to the final image.
- Sobel Filter: Creates a black/white line effect.
- Posterize: Creates a poster effect. Specify levels of color depth with the provided
Levelsinput when enabled. - Bloom: Adds bloom to bright areas in the image. Adjust using provided
RadiusDecayThresholdandWeightsettings when enabled. - Motion Blur: Adds a directional blur using the provided
RadiusandAxis Directionsettings when enabled. - Denoise: Denoises the image using different algorithms.
- Type: Sets the algorithm used to denoise the image. Can be set to
MedianorAI. - Median: Sets the median value in pixels
- Type: Sets the algorithm used to denoise the image. Can be set to
It is recommended to keep the
Mediansetting to a value of '1'.
¶ Toolbar
The Raytracing panel contains its own dedicated toolbar to provide shortcuts to further functionality.

- Save Current: Saves the currently active channel to disk.
- Save all channels: Saves all channels to disk.
 Scale Image: Automatically scales the rendered image in the raytracing viewport so that it fits the viewing area.
- Image Filtering: Applies image filtering when scaling the image to fit the raytracing viewport.
- Viewport Interaction: Allows the user to interact with the raytracing viewport to adjust the scene.
- Paint Checkerboard: Shows a checkerboard background in areas of the image that have transparency.
- Red Filter: Solos the red channel.
- Green Filter: Solos the green channel.
- Blue Filter: Solos the blue channel.
- Alpha Filter: Solos the alpha channel.
- Viewport AOV: (Arbitrary Output Variable) Displays the many render passes available from the raytracing engine. The following passes are available:
- Color
- Ambient Occlusion
- DiffuseAlbedo
- Geometric Normal
- Shading Normal
- Opacity
- Depth
- Object ID
- Emission
- Direct Illumination
- Indirect Illumination
¶ Raytracing Settings Presets
Raytracing settings can be saved and loaded as a preset. To save or load a settings preset, go to the Main Menu and choose Save Settings or Open Settings... from the File menu.
For more information on AMD Radeon™ ProRender, please refer to the official documentation here.