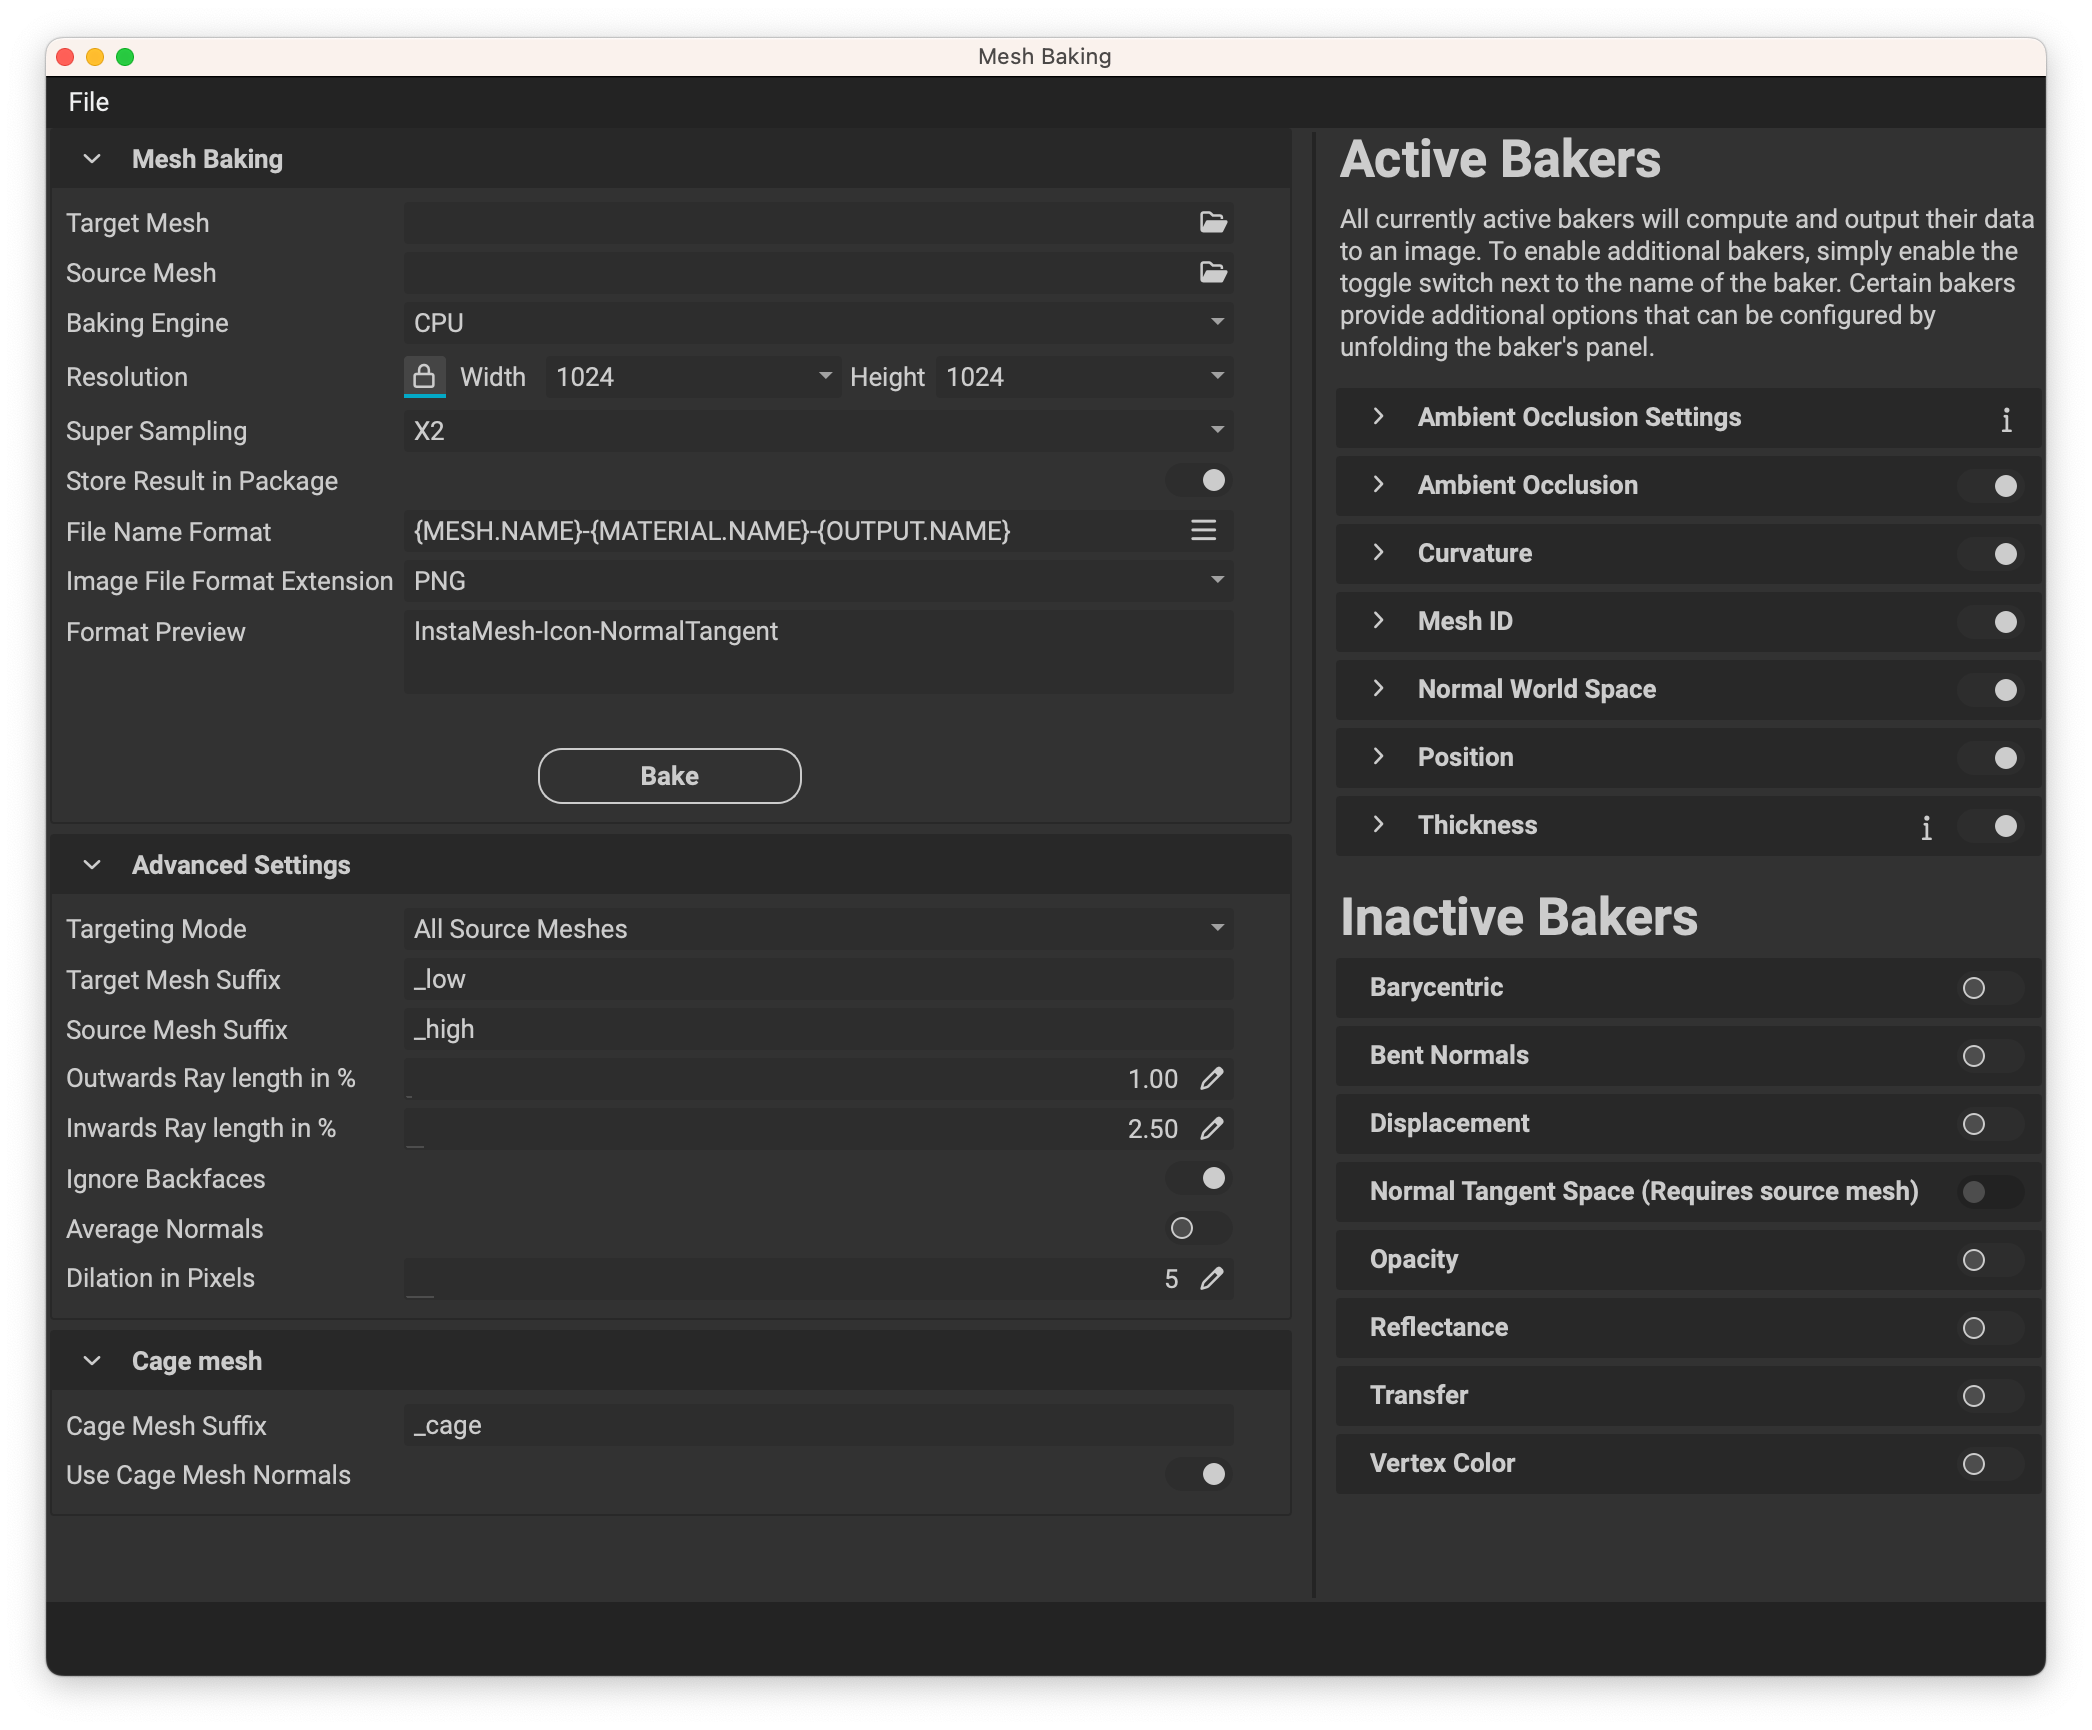
The Mesh Baking panel provides access to InstaMAT's powerful and sophisticated texture bakers. These bakers can be used to generate texture maps by extracting information from incoming mesh geometry. Specialized maps such as Ambient Occlusion, Position, Curvature, and Thickness can provide useful information on the physical characteristics of the mesh allowing for bespoke texturing and effects.
Mesh Baking is an integral part of the texturing process and is built into many parts of InstaMAT. There is even a Mesh Bake node that can be instanced in the Canvas unlocking scalable texturing workflows where a mesh is imported, texture maps are baked, and materials are applied with one Element Graph.
These incredibly optimized bakers are built with the same industry-proven technology from InstaLOD meaning that they are fully scalable in terms of both output texture dimensions and polygon counts. Meshes can be targeted by name and custom baking cages can have different topology from the target mesh. With Super Sampling, texture maps can be baked at 2-16x their resolution and then sampled down to retain their quality with a lighter footprint. Depending on your workstation, both CPU and GPU bakers are available.
InstaMAT also includes powerful automatic UV unwrapping features making it possible to construct an entire mesh creation and processing pipeline from start to finish.
¶ Accessing the Mesh Baking Panel
There are a few ways to access the Mesh Baking panel:
- Click the icon in the main window toolbar.
- Go to
Window>Mesh Bakingin the Main Menu. - In a layering project, open the
Material Sectionsdropdown in theLayering Project Editorpanel and click the hamburger menu button. From the popup menu, chooseBake Mesh Data.
¶ Interface Overview
The following section overviews the interface for the Mesh Baking panel.
The Mesh Baking panel is divided into two parts. The left contains the baking settings. The right is where bakers can be toggled on and off. Some bakers have additional options that can be configured if needed. Hovering over a setting provides additional helpful information at the bottom of the panel in its status bar.
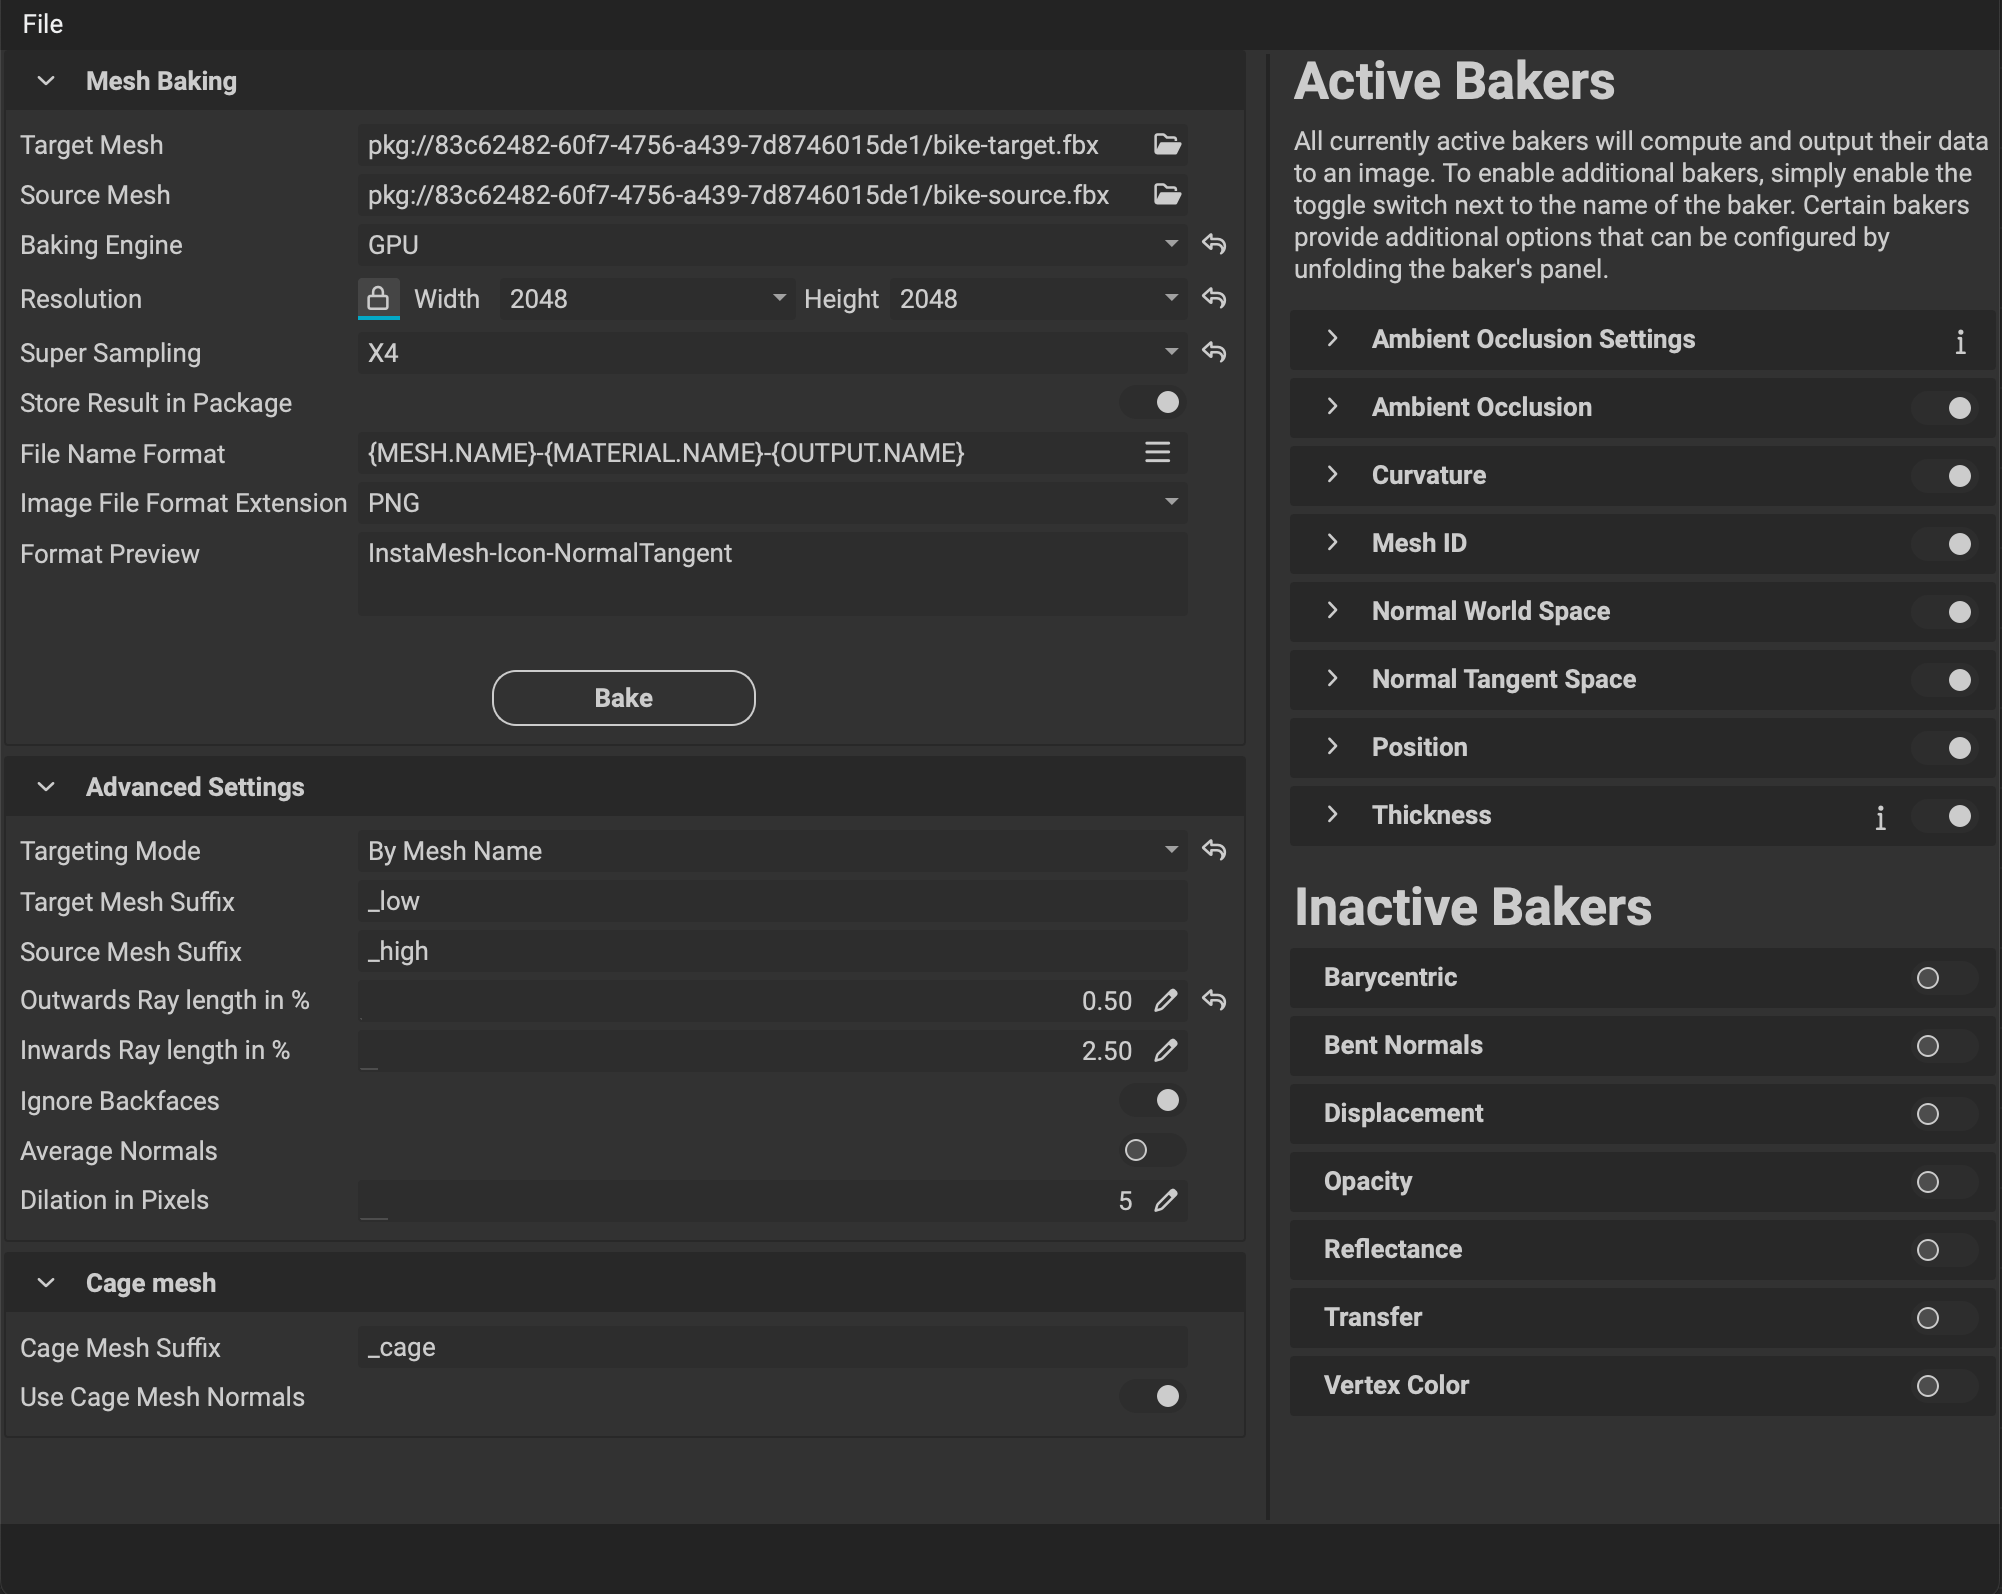
¶ Baking Settings
This section sets up all of the necessary information to perform the baking operation.
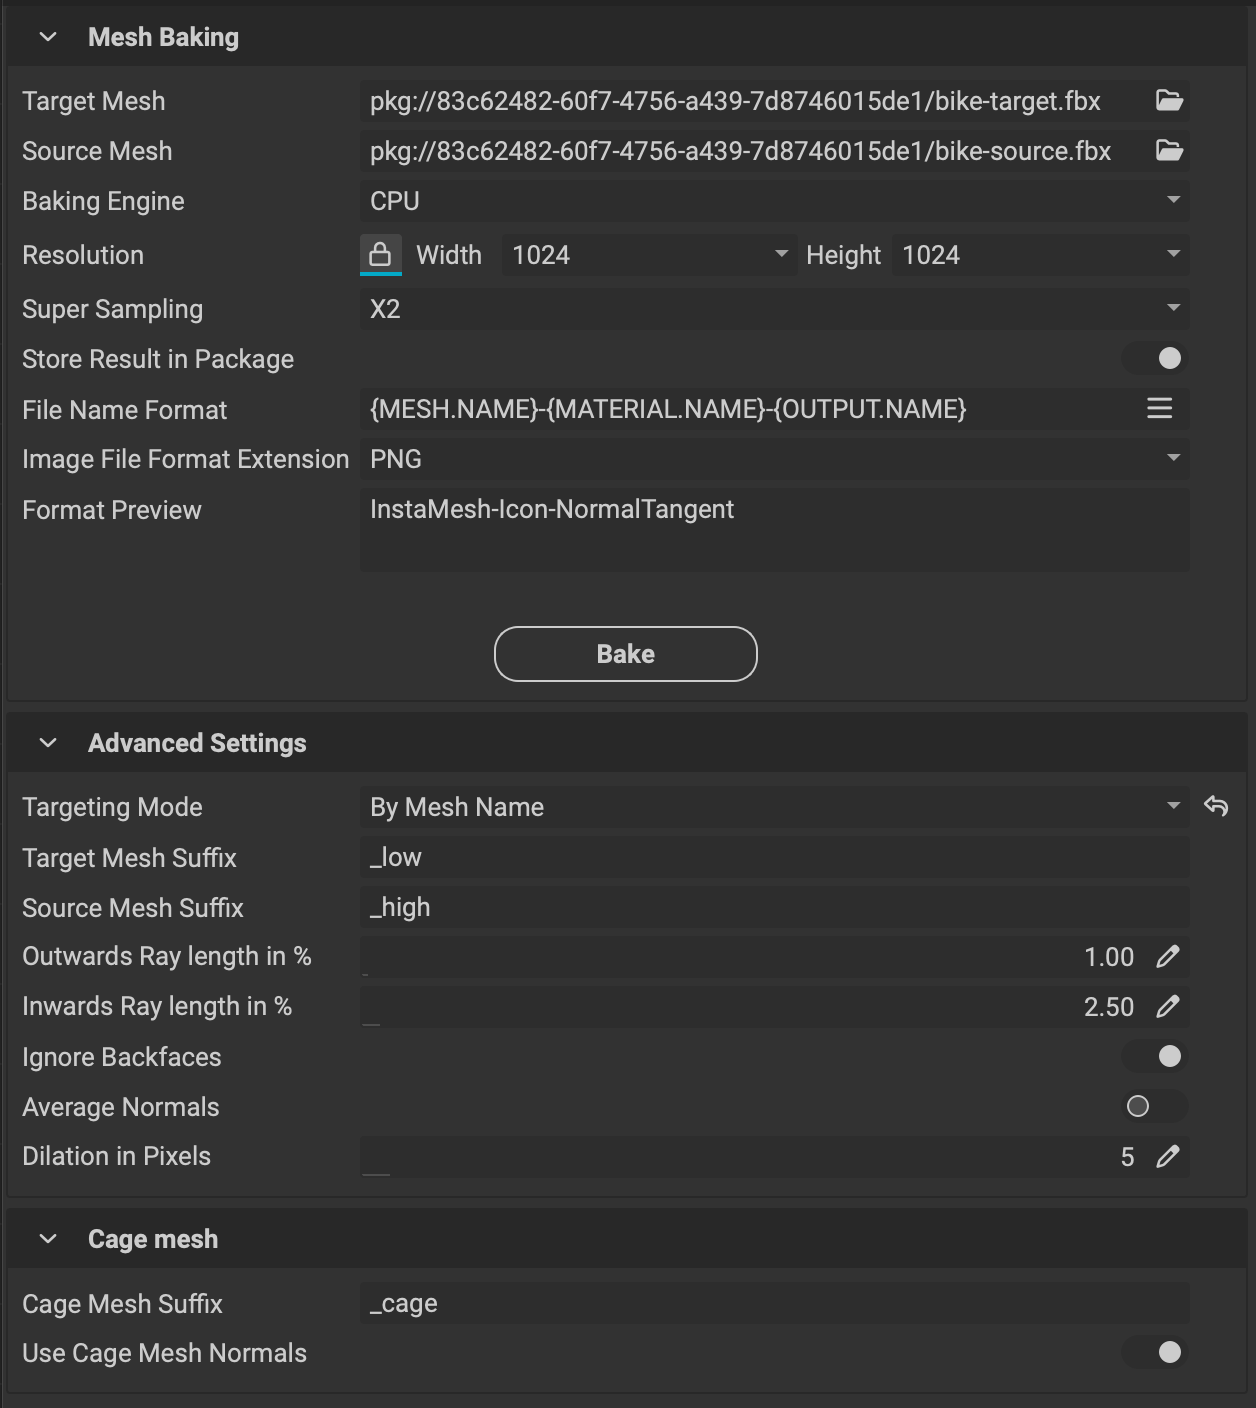
¶ Mesh Baking
These are the main baking operation settings. They determine the input meshes, baking engine, image output resolution, and other output settings for the resulting images.
- Target Mesh: Sets the target mesh. Typically this is the "low-poly" counterpart in a "High to Low Poly" baking workflow. Details from the
Source Meshwill be baked onto this mesh. - Source Mesh: Sets the source mesh. Typically this is the "high-poly" counterpart in a "High to Low Poly" baking workflow. Details from this mesh will be baked onto the
Target Mesh. - Baking Engine: Determines whether to use the CPU or GPU baking engine.
- Resolution: Sets the resolution of the baked image.
- Super Sampling: When enabled, multiplies the
Resolutionby the chosen amount. The result is then sampled down to the original resolution.
The "super sampled" result retains a majority of the quality from the higher resolution bake providing a higher quality output with a smaller footprint. Note that increasing the
Super Samplingamount will also exponentially increase memory usage and processing time.
- Store Result in Package: Stores the baking results in the currently active package. If disabled, an output path can be provided.
- File Name Format: Provides a format using variables for the file name of each baking result. Tokens can be selected using the button located to the right of the input field.
- Image File Format Extension: Determines the image output format for the baking results.
- Format Preview: Provides a preview of the naming convention used in the
File Name Formatsetting.
¶ Advanced Settings
These settings provide access to more advanced baking operations. They determine how meshes are targeted, provide options to dial in the outward and inward ray lengths, and supply further baking functionality.
- Targeting Mode: Determines how meshes are targeted during the bake. The options are
All Source MeshesandBy Mesh Name. - Target Mesh Suffix: Sets the mesh name suffix used to determine if a mesh is a target.
- Source Mesh Suffix: Sets the mesh name suffix used to determine if a mesh is a source.
Setting the
Targeting ModetoBy Mesh Namewill selectively bake matching submeshes from theSource Meshonto theTarget Mesh. Matches are made based on theSource Mesh SuffixandTarget Mesh Suffix. This prevents baking artifacts by isolating each source/target component.For example, with a
Source Mesh Suffixset to "_high" and aTarget Mesh Suffixset to "_low", a source mesh mesh named "Round_Part_high" will bake onto a target mesh named "Round_Part_low".
- Outwards Ray Length in %: Sets the outward ray length by a percentage based on the bounding sphere of the
Source Mesh. - Inwards Ray Length in %: Sets the inward ray length by a percentage based on the bounding sphere of the
Source Mesh. - Ignore Backfaces: When enabled, backfaces will not occlude geometry.
- Average Normals: Uses averaged face normals of the
Target Meshas ray directions. This only applies when not using cage mesh normals as ray directions. - Dilation in Pixels: Sets the dilation size in pixels to avoid mip map pixel bleed.
¶ Cage Mesh
These settings apply to any cage meshes in the baking process. With InstaMAT, cage meshes do not need to have the same topology as the Target Mesh.
- Cage Mesh Suffix: Sets the mesh name suffix used to determine if a mesh is utilized as a cage mesh.
- Use Cage Mesh Normals: When enabled, uses the cage mesh normals when computing ray directions instead of the
Target Meshnormals.
¶ Bakers
To enable a baker, toggle its switch on the right. The baker will move to its active or inactive position in the panel. To access a baker's options, use the to the left of the baker's name.
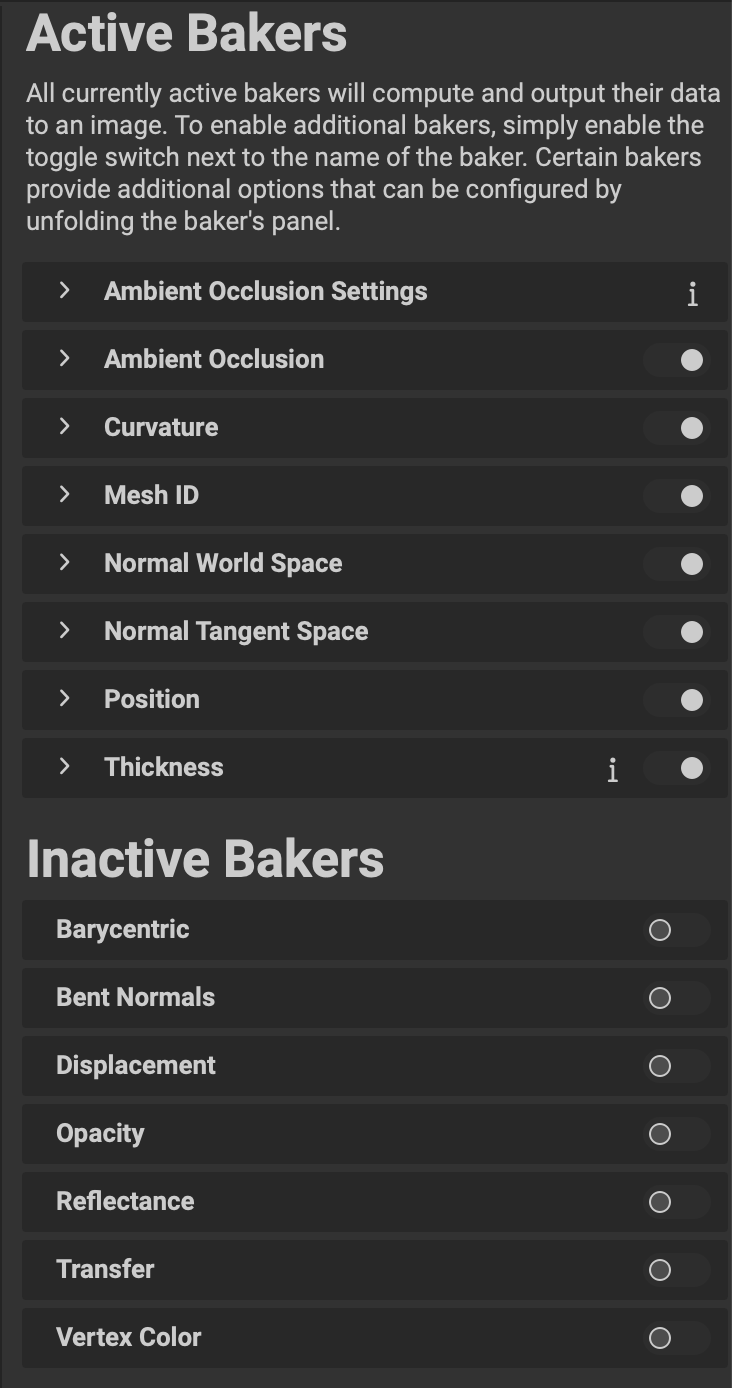
The following bakers have additional options:
¶ Ambient Occlusion, Bent Normals, Reflectance
These bakers share their settings.
- Ray Length in %: Sets the ray length by a percentage based on the bounding sphere of the mesh.
- Intensity: Sets the scale factor for the Ambient Occlusion value.
- Surface Offset in %: Sets the surface offset by a percentage based on the bounding sphere of the mesh.
- Cone Angle: Sets the minimum angle for the sampling cone. Set to 0 for a 180º rotation or to 1 for a 0º rotation.
- Attenuate By Distance: Enable to attenuate Ambient Occlusion values by distance.
- Random Deviation: Randomizes the deviation for each sample. This results in the common noisy appearance seen in baked Ambient Occlusion maps.
- Submesh Filtering: Filters the rays based on the submesh filtering settings.
- Fall-Off Square: Sets the fall-off to square which results in a smoother map.
- Sample Count: Sets the amount of sub rays to cast for each pixel.
Increasing the
Sample Countincreases both the quality of the output texture and the processing time.
- AO Blur Kernel: If enabled by having a value greater than 0, sets the size of the Ambient Occlusion blur kernel.
The Bent Normals baker output will not be blurred.
- Sampling Type: Determines the sampling type used when generating ray directions.
¶ Curvature
- Strength: Sets the visibility of the details on the Curvature map.
¶ Mesh ID
- By Individual Source Mesh: When enabled, calculates the Mesh ID map based on the individual source meshes.
¶ Position
- Normalize Position by AABB: Normalizes the Position map output by the axis-aligned bounding box. If disabled, the Position map is normalized using the mesh's bounding sphere.
¶ Thickness
- Ray Length in %: Sets the ray length by a percentage based on the bounding sphere of the mesh.
- Surface Offset in %: Sets the surface offset by a percentage based on the bounding sphere of the mesh.
- Cone Angle: Sets the minimum angle for the sampling cone. Set to 0 for a 180º rotation or to 1 for a 0º rotation.
- Normalize: Normalizes the minimum and maximum thickness values.
- Random Deviation: Randomizes the deviation for each sample. This results in the common noisy appearance seen in baked Thickness maps.
- Submesh Filtering: Filters the rays based on the submesh filtering settings.
- Sample Count: Sets the amount of sub rays to cast for each pixel.
Increasing the
Sample Countincreases both the quality of the output texture and the processing time.
- Blur Kernel: If enabled by having a value greater than 0, sets the size of the Thickness blur kernel.
- Sampling Type: Determines the sampling type used when generating ray directions.
¶ Displacement
- Full Range: Outputs a full range Displacement map. This means that the lowest point in the Displacement map is set to 0 and the highest is set to 1 in the output image.
¶ Normal Tangent Space
- Binormal Per Fragment: This setting depends on how your renderer/engine computes the tangent basis. Unreal Engine: On, Unity: Off.
- Normalize Per Fragment: This setting depends on how your renderer/engine computes the tangent basis. Unreal Engine: Off, Unity: Off.
- Output Tangent Space: Sets the output type of the automatically-computed tangent space. Can either be
OpenGLorDirectX.
¶ Baking Process Overview
The following is how to bake mesh maps using the Mesh Baking panel in InstaMAT Studio:
- Select a
Source Meshand aTarget Meshby clicking the icon. From the popup menu, choosePick Package Resourceto select a mesh from within the currently active package. ChoosePick Local Fileto select a mesh with your system's folder structure. - Choose the output
Resolutionfor the baked images. - Choose a
Super Samplingvalue if desired. This will multiply the outputResolutionby the chosen factor, then sample the image down to the original result. - Enable each baker with its dedicated switch on the right. Bakers will move to their Active and Inactive positions on the panel.
- Press the
Bakebutton.
Baking does not require both a
Source Meshand aTarget Mesh. To generate mesh bake data for a single mesh, input it as theTarget Mesh. This is useful when the need to transfer high-poly information onto a low-poly representation is not required, and instead the bakers are used specifically to extract information and generate maps for texturing effects and tools such as theMesh Mask Builderor a smart prefab layer material.
¶ Baking by Mesh Name
InstaMAT's bakers can selectively target sets of meshes based on the suffixes of each individual submesh name. Baking by mesh name avoids baking incorrect source geometry and prevents baking artifacts. This removes the need to "explode" meshes when baking.
The following illustrates how to bake by mesh name in a typical "High to Low Poly Workflow" using InstaMAT's Mesh Baking panel:
¶ 1. Prepare the Meshes
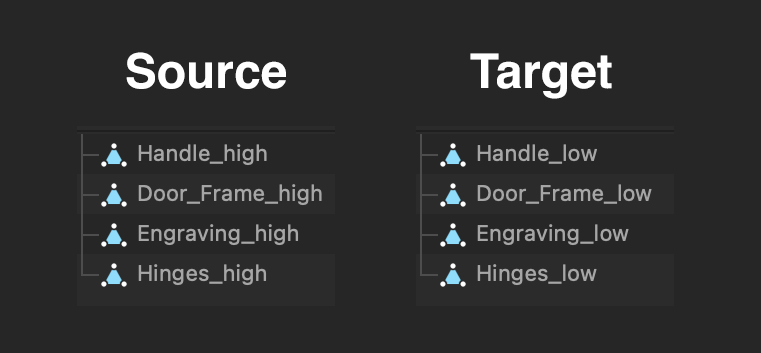
The Source Mesh that contains the high-poly information will require every submesh in the scene to have an identifiable mesh name suffix also known as the Source Mesh Suffix. By default this suffix is "_high". For example, "Metal_Attachment_high" or "Cabinet_Door_high".
The Target Mesh that contains the low-poly information will require each submesh to have a matching low-poly counterpart from the Source Mesh and should be in the exact same position as the high-poly variant. These low-poly counterparts should have the same name as their high-poly counterparts with the exception of a Target Mesh Suffix at the end. By default this suffix is "_low". For example, "Metal_Attachment_low" or "Cabinet_Door_low".
These suffixes can be set under the Advanced Settings section in the Mesh Baking panel.
¶ 2. Set Up the Bake
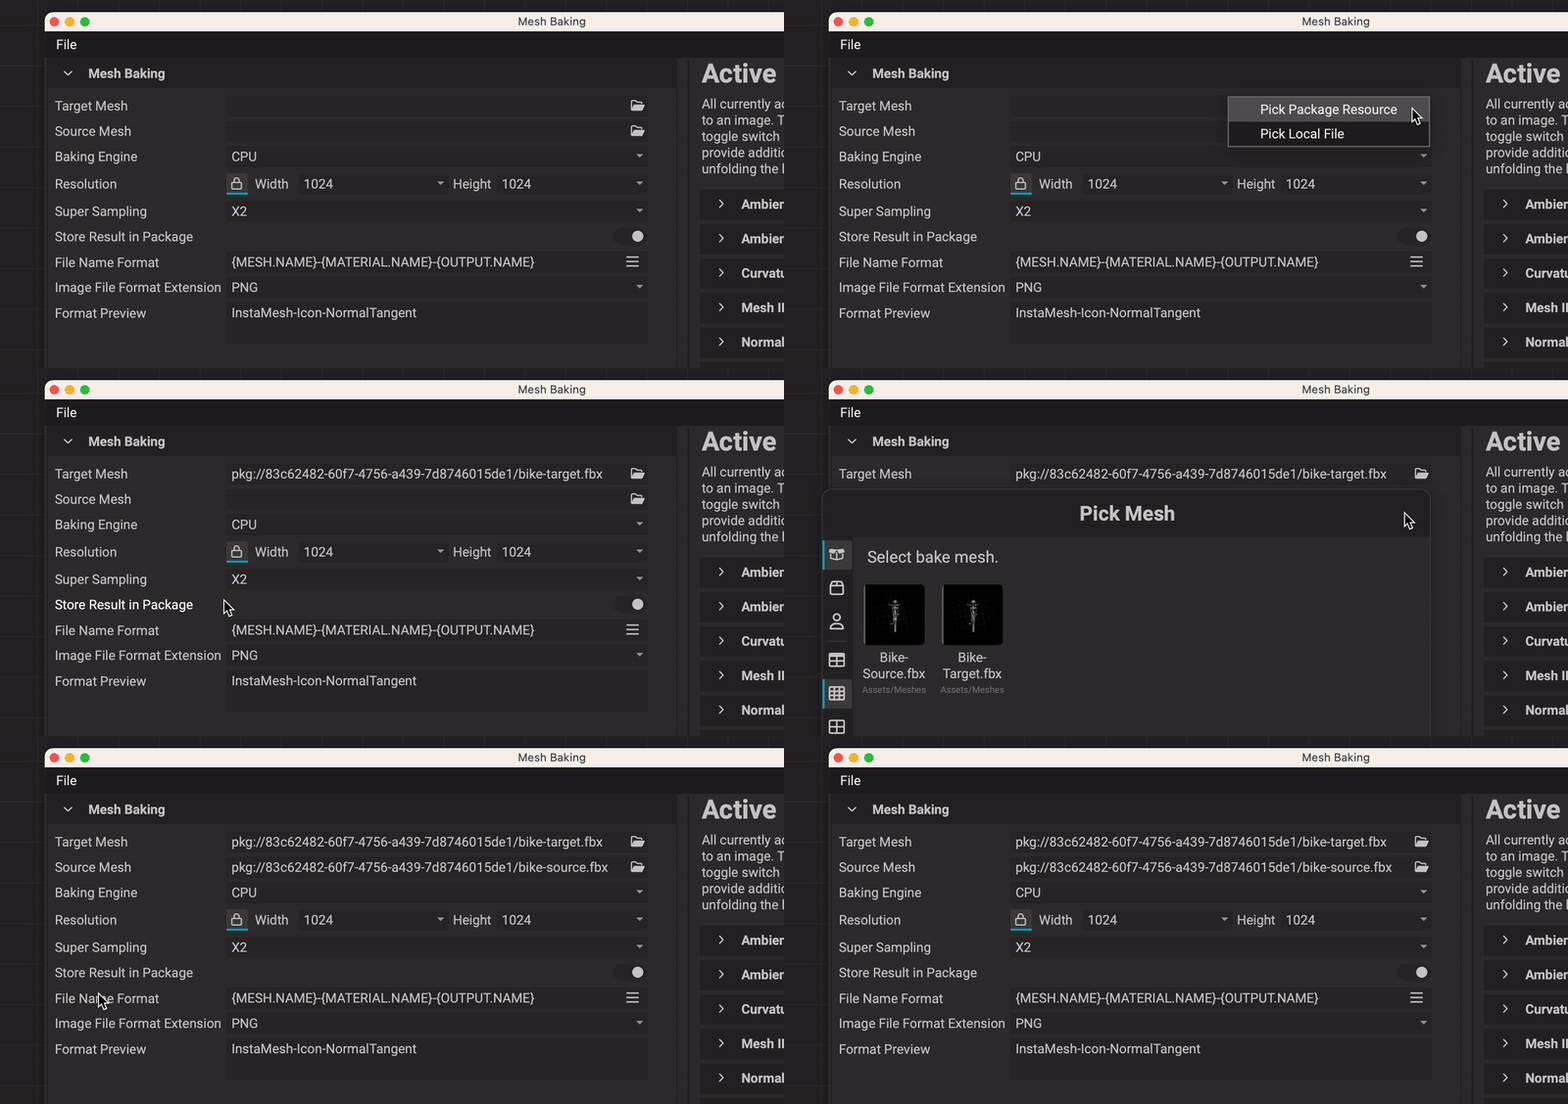
Meshes can be dragged into the Package Management panel and imported into the project first. This will copy the mesh into the active package. Alternatively, meshes can be selected as local files and do not need to be imported into the project.
Input the Source Mesh and Target Mesh into their respective fields by clicking on the . From the popup menu, choose Pick Package Resource to select a mesh from within the currently active package or choose Pick Local File to select a mesh with your system's folder structure.
Be sure to change the Targeting Mode to By Mesh Name.
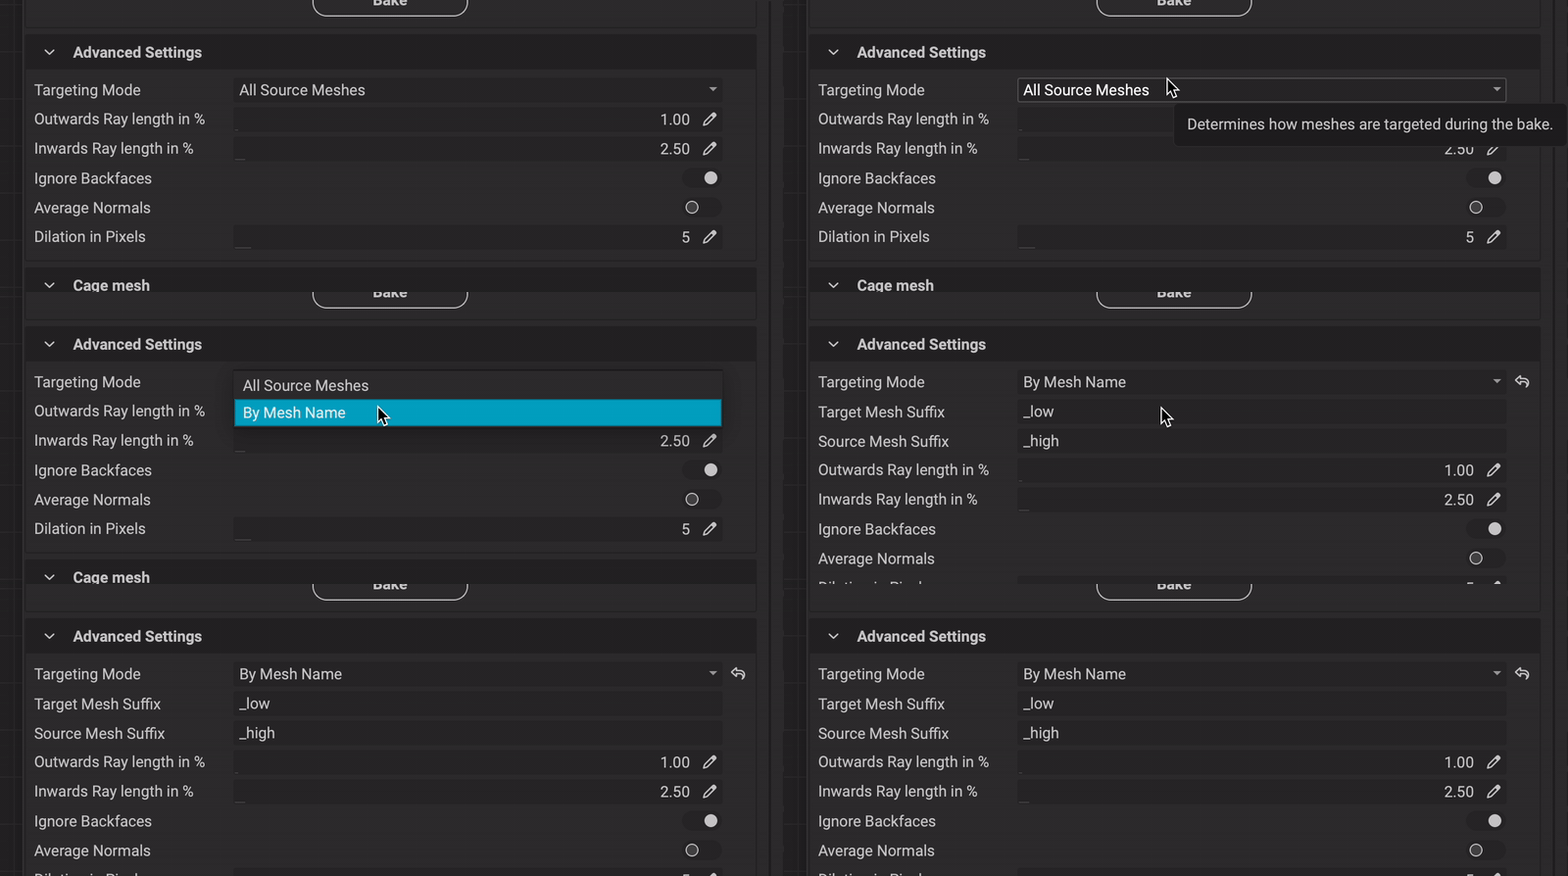
Make sure that the Target Mesh Suffix and Source Mesh Suffix match the hierarchy of your respective meshes.
¶ 3. Bake
 The rest of the baking process is the same as the above Baking Process Overview. After your selected bakers are enabled and the rest of the baking settings are dialed in, click the
 Bake button to begin the bake. If Store Result in Package in the Mesh Baking section is enabled, the baked mesh maps will appear in the Package Management panel. When baking from a layering project, baked mesh maps for the asset will automatically populate the proper channels in the Material Sections area in the Layering Project Editor.