
The Viewport Settings panel provides access to all of the adjustments and parameters needed to control InstaMAT Studio's 3D Viewport. In addition, there are a few settings to control the Image Viewer and, when working in the Canvas, adjust the node thumbnail previews.
¶ Interface Overview
The following is an overview of the interface for InstaMAT Studio's Viewport Settings panel.
¶ Camera Settings
These settings control the tonemapping, exposure, and other typical adjustments for the camera used in the Viewport.
- Tonemap Operator: Sets the tonemapping type for the
Viewport. - Automatic Exposure: Automatically adjusts the exposure of the camera based on lighting changes.
- Exposure: Manually sets the exposure of the camera effectively setting the amount of light it captures.
- Field Of View: Sets the horizontal field of view of the camera in degrees.
- Hue: Performs an overall adjustment to the hue of the image.
- Saturation: Performs an overall adjustment to the saturation of the image.
- Lightness: Performs an overall adjustment to the lightness of the image.
- Contrast: Performs an overall adjustment to the contrast of the image.
¶ Canvas and Image Viewer Settings
These settings control the Canvas thumbnail previews and Image Viewer.
- Tonemap Operator: Sets the tonemapping type for the
Canvaspreviews andImage Viewer. - Exposure: Manually sets the exposure of the image.
¶ Environment Settings
These settings determine the render mode for the Viewport and control the environment image that is used to illuminate the scene.
- Render Mode: Sets the active render mode. By default this is set to the
PBRrender mode for physically-based lighting and reflections. - Environment: Sets the environment image used as a background and illuminates the scene.
- Opacity: Sets the opacity of the environment image. Setting to
0will remove the appearance of the environment while still generating lighting and reflections. - Blur: Sets the blur amount for the background environment image.
- Rotation: Sets the rotation of the environment image. In addition to this setting, the keyboard shortcut Shift + Right Click and dragging left and right on the
Viewportwill rotate the environment. - Continuous Rotation: Enabling this will continuously rotate the environment image.
- Orbit Camera: Enabling this will continuously orbit the camera around the scene effectively creating a "turntable" for quick design reviews.
¶ Scene Settings
These settings enable additional GUI elements in the Viewport.
- Show Grid: Renders a grid that automatically adjusts its cell size based on the position of the camera.
- Show Normals: Shows the vertex normals of the objects in the scene.
¶ Gizmo Settings
These settings adjust the gizmos used in the Viewport. These gizmos provide manual and visual adjustment of objects and effects directly within the Viewport itself.
- Positional Increment: Sets the interval gizmos will snap to. To enable snapping, hold the J key when moving a gizmo.
- Angular Increment: Sets the interval gizmos will snap to. To enable snapping, hold the J key when rotating a gizmo.
¶ Render Settings
These settings enable and adjust many useful rendering features in the Viewport.
- Wireframe Overlay: Renders a wireframe on the meshes in the scene.
- Show Backfaces: Toggles rendering backfaces.
- (FXAA) Anti-Aliasing: When enabled, renders the scene with Fast Approximate Anti-Aliasing.
- Mip Mapping: Toggles mip mapping when rendering textures. By default, Mip mapping is disabled in layering projects. To force enable, use the
Allow Mip Mapping in Layeringsetting in the Preferences panel under theLayeringtab. - Material AO Intensity: Adjusts the intensity of the Ambient Occlusion channel in the
Viewport. This does not affect the levels of the AO map directly but the visual appearance in theViewportonly. - Mesh UV Scale: Controls the UV scale of all meshes in the scene. To quickly cycle through a UV scale of 1-5, press the U key.
- Scene Point Scale: Adjust the scale of all rendered points when viewing point clouds.
- Displacement Mode: The mode used when rendering displacement in the scene. Choose between
TessellationandPOM: Parallax Occlusion Mapping.
Choosing
Tessellationwill tessellate the geometry in the scene and displace the vertices based on their normal directions.POMor "Parallax Occlusion Mapping" is useful to render displacement over meshes that have sparse topology or a low level of subdivision.
- Displacement Factor: Controls the factor at which displacement gets applied.
- Tessellation Level: Controls the tessellation factor of the scene. Increasing the level of tessellation on a mesh with already dense topology will decrease performance.
- Use Physical Size: When enabled, a physical size can be specified for the graph.
¶ Raytraced Effects
These settings enable and control the raytracing effects in the Viewport. Use the general Raytraced Effects toggle in the section heading to enable or disable all raytracing effects.
- Shadows: Enables rendering of raytraced shadows.
- Shadows Attenuation: The reduction of a shadow intensity with distance.
- Shadows Bias: Adds a bias to shadow calculations to prevent rendering artifacts.
- Global Illumination: Enables rendering of raytraced Global Illumination.
- Global Illumination Bounces: The maximum number of bounces for Global Illumination.
- Transmission Absorption: The transmission absorption factor for translucent materials.
- Reflections: Enables rendering of raytraced reflections.
- Raytracing Frame Count: The maximum number of raytracing frames to accumulate for denoising.
- Render Quality: The render quality of the raytraced effects
Note: A higher quality requires more processing power and may result in lower frame rates and an unresponsive user interface. It's recommended to use
Very Highonly when rendering a beauty shot.
Note: Raytracing effects such as Global Illumination and Reflections currently work with one mesh material only.
¶ Shaders
This area allows you to select and create custom shaders for the real-time Viewport. Select a shader from the Active Shader dropdown menu.
To create a custom viewport shader:
- Click the button in the top right of this section.
- Select
Manage Viewport Shadersfrom the dropdown menu. - In the
Shader Editorpanel, click theAdd Shaderbutton.
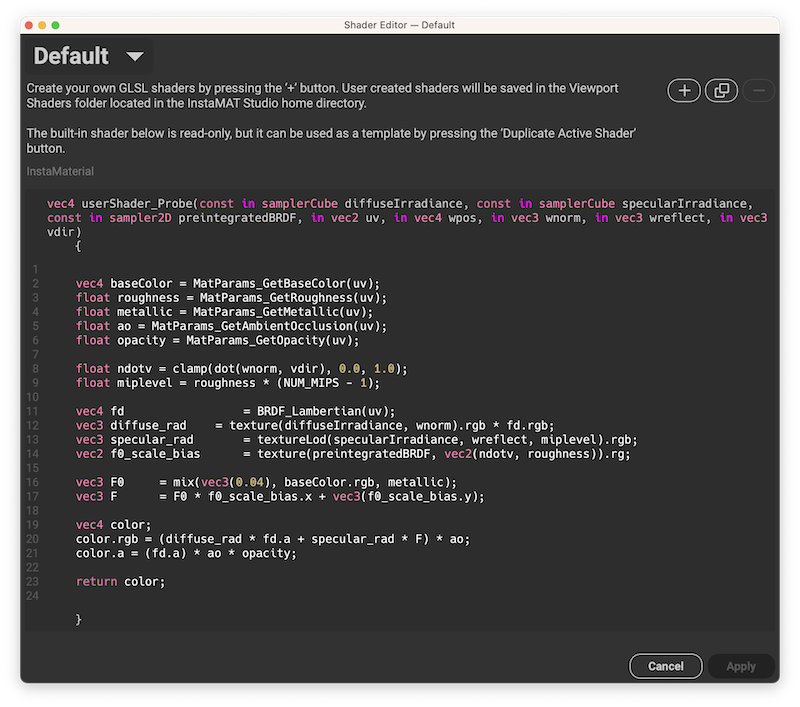
Custom shaders are stored in the
Viewport Shadersfolder located in the InstaMAT Studio home directory.